Xmas Tree Candle Wrapper SVG

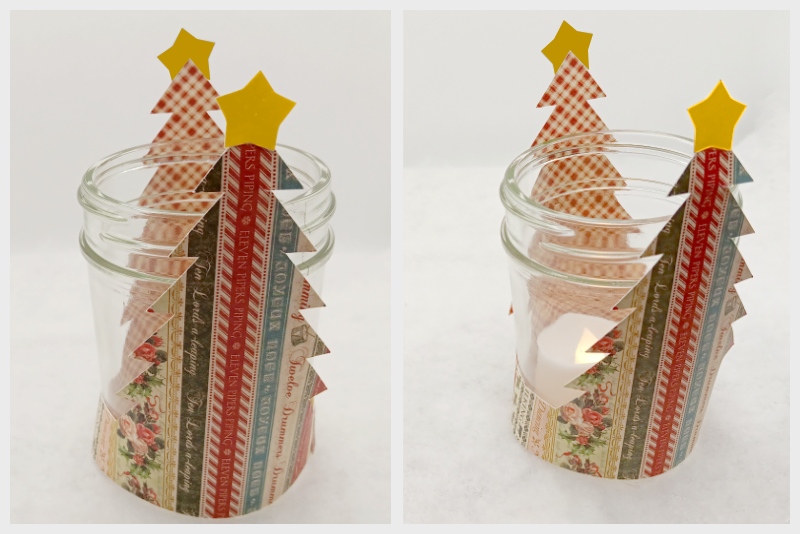
In this Silhouette Studio® tutorial, we will create a candle wrapper SVG file for a small candle jar. It will be a candle wrapper cut from cardstock or pattern paper in the shape of evergreen trees.
The candle jar we will be working with is 8 inches around the circumference and 4 inches high. It is the perfect size to have one candle at each person at your holiday table.
I will be using Silhouette Studio Business Edition but these steps can be done in any edition of the software. However, some of the features such as the Flexishapes, will not be available.
As the circumference of the candle is 8 inches, the entire width of the candle wrapper will be 8.5 inches. This will give us a nice overlap for gluing the wrap together. The trees will be 4 inches tall, with a golden star at the top peeking above the candle jar.
Open Silhouette Studio and let's get started. Let's start be adding a guideline to the workspace. We will be working in Landscape mode.
Let's cut out the candle wrapper first. So we need to remove the stars from the cutting area.
Silhouette, Silhouette Studio, Silhouette Connect, PixScan, Silhouette CAMEO and Silhouette Portrait are either registered trademarks or trademarks of Silhouette America, Inc. Product screen shot(s) reprinted with permission from Silhouette America®, Inc.
The candle jar we will be working with is 8 inches around the circumference and 4 inches high. It is the perfect size to have one candle at each person at your holiday table.
I will be using Silhouette Studio Business Edition but these steps can be done in any edition of the software. However, some of the features such as the Flexishapes, will not be available.
As the circumference of the candle is 8 inches, the entire width of the candle wrapper will be 8.5 inches. This will give us a nice overlap for gluing the wrap together. The trees will be 4 inches tall, with a golden star at the top peeking above the candle jar.
Open Silhouette Studio and let's get started. Let's start be adding a guideline to the workspace. We will be working in Landscape mode.
- In the PAGE SETUP panel, set the Machine to Cameo, Feed Type of Auto/Manual, Cutting Mat to 12 x 12 inches, Media Size to Letter and Orientation to Landscape.
- From the right side, drag a Guideline from the Ruler to the center of the cutting area.
- With the Rectangle tool, draw a rectangle that is 8.5 inches wide and .75 inch tall (see screenshot).
- With the Heart Flexishape, draw a very flat heart that covers most of the base, omitting the .25 inch overlap area at both ends (see screenshot).
- Select both the base and the heart. From the Quick Asset Toolbar, click the Weld tool (see screenshot).
- With the Tree Flexishape, draw a tree that is about 3 inches wide and 4 inches tall. Slightly overlap the base of the tree with the base of the wrapper (see screenshot).
- Duplicate the tree and drag it to the right side of the wrapper.
- Select both trees, right-click and choose Group.
- With both trees selected, center them over the wrapper bottom.
- Select all of the shapes and weld them together (see screenshot).
- With one of the Flexishape Star tools, draw two stars at the top of the cutting area (see screenshot).
This will be the bottom of the candle wrapper. We want it to look like there is snow on the ground. Let's add a curve to represent the snow.
Now that we have the base for our candle wrapper, let's draw the trees. The Flexishapes has four tree shapes. Use the one that you like best.
Let's duplicate the tree for the other side of the wrapper.
The only cut lines that we need now are for the two stars. Draw the stars at the top of the cutting area, as we will be cutting the stars from metallic paper.
Let's cut out the candle wrapper first. So we need to remove the stars from the cutting area.
- Drag the two stars to the left and off of the cutting area.
- Click the SEND tab to open that panel (see screenshot).
- Add the patterned paper that you wish to use for the wrapper to your cutting mat.
- Click the SEND button at the bottom to cut the candle wrapper.
- Replace the patterned paper with the gold metallic sticker paper for the stars.
- In the software, remove the candle wrapper off of the cutting area and move the two stars onto the cutting area.
- Load the metallic paper in to your Silhouette and click SEND again.
- Glue the two .25 inch tabs together to form the wrapper.
- Glue the stars at the top of the trees.
Silhouette, Silhouette Studio, Silhouette Connect, PixScan, Silhouette CAMEO and Silhouette Portrait are either registered trademarks or trademarks of Silhouette America, Inc. Product screen shot(s) reprinted with permission from Silhouette America®, Inc.

Related Articles
Editor's Picks Articles
Top Ten Articles
Previous Features
Site Map
Content copyright © 2023 by Diane Cipollo. All rights reserved.
This content was written by Diane Cipollo. If you wish to use this content in any manner, you need written permission. Contact Diane Cipollo for details.


